

Patch Bay

Generic Custom Patch Bay

Generic·Model Custom·custom-patch-bay

CUSTOM PATCH · CH 1-4
GenericCustom

About the Generic Custom

A blank patch bay you can fully configure per placement. Drop one into your rack, then open its details to configure up to 48 ports of any type — XLR male/female, TRS, etherCON, USB-C, HDMI, BNC, Dante, and more. Each port can carry a different connector on the front than on the rear, so feed-through adapter panels (XLR female out front, 1/4" TRS solder tail at the back) model honestly. Useful for modeling custom stage boxes, house patch panels, or one-off breakout panels that don't exist in any manufacturer's catalog. Each instance is customized independently.

Every rig has at least one panel that doesn't exist in any manufacturer's catalog — the custom stage box your shop fabricated, the house patch panel bolted into the venue wall, the breakout snake someone built for a one-off festival. The Custom Patch Bay is a placeholder for exactly those pieces. Drop it into your rack plan, then configure it to reflect what you actually have: up to 12 ports of mixed types — XLR, TRS, etherCON, BNC, USB-C, HDMI, Dante — whatever the real panel carries. It exists so your rig diagram tells the truth.

In practice, this unit sits at 1U and draws no power, so it costs you nothing in rack real estate beyond the physical space and adds no load to your power calculation. The default weight of 1 kg is a rough placeholder; a fully populated 12-port XLR panel will run heavier, and a simple two-connector breakout plate will run lighter. The 100 mm depth is similarly generic — verify your actual panel depth before finalizing rack drawer or doghouse clearances. Port count and type are what matter here, and those you configure yourself per instance, so two custom bays in the same rack can represent two completely different physical panels.
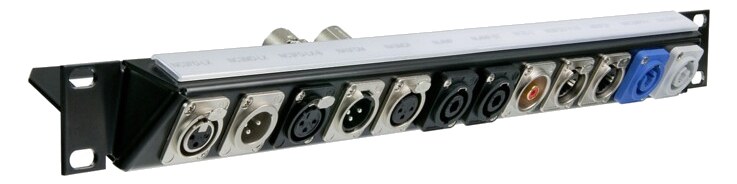
This entry belongs in your plan any time you need to document a piece of signal infrastructure that doesn't have a proper catalog listing — shop-built boxes, venue-installed tie lines, rental-house customs, or prototype gear. It is not a substitute for real product data when a cataloged item exists; if your patch bay has a manufacturer and model number, find the actual listing so weight, depth, and port truth are accurate from the start. Use the notes and BOM fields to record actual cost and weight, because the defaults here are intentional zeroes — the app won't guess for you.

In the rack

  • Configure each instance independently — if you have a 6-XLR stage box and a 4-port etherCON panel in the same rack, drop two separate Custom Patch Bays and set their ports to match each physical panel exactly.
  • Update the weight field in your BOM before finalizing rack weight calculations; a 12-port XLR panel with a steel chassis can easily run 2–3 kg, which matters when you're spec'ing a fly rig or calculating case payload.
  • Use the label field on each port to mirror whatever is silkscreened or engraved on the real panel — 'MON L', 'TALK', 'DANTE 1' — so your rig diagram doubles as a usable reference at load-in.
  • If the physical panel's depth is deeper than 100 mm, correct it before checking rack drawer clearance — a custom fab box with rear XLR barrels and strain reliefs can easily push 150–200 mm and conflict with rear power strips or cable management.

Configure up to 48 ports of any type per instance, with a separate connector on each face. Placeholder cost/weight — edit in your own BOM.

I/O Ports (4)

PortConnectorDirectionSignalChannels
Port 1XLR FEMALEbidirectionalanalog audio
Port 2XLR FEMALEbidirectionalanalog audio
Port 3XLR FEMALEbidirectionalanalog audio
Port 4XLR FEMALEbidirectionalanalog audio

Related gear

Community rigs using this gear (1)

Browse all rigs →

Related articles

Guides from our library that cover planning around patch bay gear.