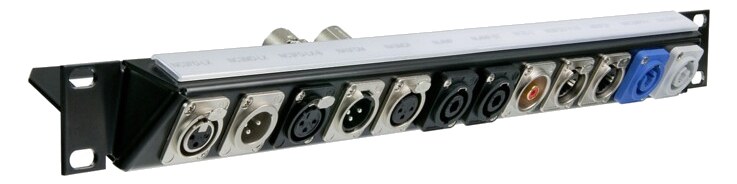
The Redco R196 breakout panel converts a single DB25 connector on the rear into eight individual XLR connections on the front, which is essential when interfacing DB25-equipped gear like the Apollo x16 or RedNet A16R with standard XLR cables. It eliminates the need for bulky DB25 fan-out snakes dangling from the back of your rack. One panel per DB25 port keeps your wiring tidy and professional.
~$299Use retailer rows for current price and stock
01 · What it does—and what that changes in your rig.
Product overview
Start with the payoff, then work through how it functions, where it fits, and the details that change a real build.
The payoff
Patch Bay decisions, organized around the whole rig.
The Redco R196 is a passive breakoutA cable that splits one multichannel connector (like a DB25) into individual plugs — the octopus that turns 8 channels into 8 XLRs. panel that converts a single DB25A 25-pin D-shaped connector carrying 8 channels of analog or AES audio in one multicore — the Tascam pinout is the de-facto standard. connector on its rear into eight discrete XLRThe standard 3-pin locking connector for mics and balanced line signals — pin 1 is the shield, pins 2 and 3 carry the balanced pair. female jacks on its front face — all in 1UThe standard slice of rack height: 1U = 1.75″. A 3U box takes three slices; half-rack gear pairs two units side by side in one., drawing zero power. Its job is interface translation: gear like an Apollo x16 or a DanteThe most common audio-over-network standard: dozens of channels of uncompressed digital audio down one ordinary Ethernet cable between Dante boxes. interface with DB25 outputs speaks a different physical language than the XLR world everything else lives in, and this panel is the interpreter. It sits permanently in the rack and turns that impedanceOpposition to signal flow, in ohms. Low-impedance IEMs are easier to drive loud; mismatches shift level and tone. mismatch into a clean, labelable row of industry-standard connectors that any stagehand or guest engineer can work with without hunting for a specialized cable.
Documented outputs
00 destination connections
Documented inputs
0Based on documented inputs
Rack space
1UBuilder checks available rail space
Redco product panel1U · 0W
Function
How it works in the path
At 50 mm deep and 1 kg, this panel barely exists in your rack — it's essentially flush. That shallow depth matters on fly datesA gig you fly to instead of driving — the whole rig has to shrink into checkable cases and carry-ons. where rolling racks need to close and latch without rearranging cable management. The eight female XLRsThe standard 3-pin locking connector for mics and balanced line signals — pin 1 is the shield, pins 2 and 3 carry the balanced pair. on the front face your working environment, so inputs or outputs from your interface are immediately accessible without reaching around the back. Because it's entirely passive, there's no signal path coloration, no power requirement to budget, and nothing to fail electronically. The $299 price reflects Redco's build quality — machined panel, proper Neutrik-style connectors — over the cheaper DB25A 25-pin D-shaped connector carrying 8 channels of analog or AES audio in one multicore — the Tascam pinout is the de-facto standard.fan-outA cable that splits one multichannel connector (like a DB25) into individual plugs — the octopus that turns 8 channels into 8 XLRs.snakesA multicore cable bundling many channels into one stage-to-console run. A sub-snake collects one corner of the stage into a drop box. that flap loose and develop intermittent contacts after a few tours.
Best fit
Where it earns its place in the rack
This panel earns its rack space if you have any DB25A 25-pin D-shaped connector carrying 8 channels of analog or AES audio in one multicore — the Tascam pinout is the de-facto standard.-equipped interface and want a permanent, professional termination point rather than a dangling octopus cable. One panel per DB25 port is the right approach — don't try to share or daisy-chain. If your interface has four DB25 ports and you need all 32 channels terminated this way, budget four units and four rack spaces. If you only occasionally need a couple of channels off a DB25 port, a quality fan-outA cable that splits one multichannel connector (like a DB25) into individual plugs — the octopus that turns 8 channels into 8 XLRs. cable is cheaper and takes no rack space. This is a touring or install solution for engineers who want the same patch point every show, not a workaround for a one-off session.
In the rack
Details worth deciding before load-in.
Label each XLRThe standard 3-pin locking connector for mics and balanced line signals — pin 1 is the shield, pins 2 and 3 carry the balanced pair. jack on the front panel with a P-touch or engraved label before the first show — 'MON L,' 'MON R,' 'IEMIn-Ear Monitor — earpieces that replace floor wedges, feeding each player their own mix. The reason this whole rack exists. A,' etc. — so the panel functions as both a termination point and a quick-reference map of your interface routing.
Mount it immediately adjacent to the interface it's serving; every inch of DB25A 25-pin D-shaped connector carrying 8 channels of analog or AES audio in one multicore — the Tascam pinout is the de-facto standard. cable between the interface's rear output and this panel's rear input is a potential failure point and an awkward bend radius.
Use a short, high-quality DB25A 25-pin D-shaped connector carrying 8 channels of analog or AES audio in one multicore — the Tascam pinout is the de-facto standard. cable (12–18 inches is ideal) from the interface to the panel's rear. Longer DB25 runs are where pin contact issues tend to show up — keep it as short as your rack layout allows.
If you're running this panel for outputs (sends to wedgesA floor monitor speaker angled up at the performer — the thing IEMs replace, and the thing you fall back on when they die. or amps), orient your rack so the front XLRsThe standard 3-pin locking connector for mics and balanced line signals — pin 1 is the shield, pins 2 and 3 carry the balanced pair. face the direction your stage cables run — it eliminates the 180-degree cable loop that happens when the panel faces the wrong wall of a closed rack.
02 · Know the whole path before you buy.
Signal path
Learn the route as a block diagram: source, product function, transport, and destination. Select any block to see what enters, what changes, and what leaves.
Interactive block diagramAuto-looping · hover, focus, or tap to hold a stage
Port-type signalProduct functionSystem boundary
Follow one signal from source to destination
Each block answers the same three questions: what arrives, what changes here, and what leaves.
01 · Connection · selected
XLR female + db25
01 · Connection
9 bidirectional connections
XLR female + db25
Connection
9 bidirectional ports
Connector
XLR female + db25
Signal
analog audio
03 · What this product asks of the rest of the system.
Compatibility
Treat connector names as the start of the check—not the answer. These are the boundaries that determine a complete working path.
Best fit · Patch Bay
Use it when 1U and 50 mm of depth fit the case.
Plan the companion path
Complete the path with upstream and downstream gear that matches connector, direction, signal type, protocol, and wiring standard.
Connector boundary
Documented connectors: XLR female, db25. Match connector, direction, and signal type—not shape alone.
04 · Every connector, grouped by job.
I/O ports
Switch the product view and the documented port inventory updates with it—hardware and data stay side by side.
Every connector, grouped by job.
Switch panels to keep the hardware view and the documented port list in sync.
Front panelRear panel
All documented ports for Redco R196 DB25 to XLR Panel
Port
Panel
Connector
Direction
Signal
Channels
XLR 1
front
XLR female
bidirectional
analog audio
—
XLR 2
front
XLR female
bidirectional
analog audio
—
XLR 3
front
XLR female
bidirectional
analog audio
—
XLR 4
front
XLR female
bidirectional
analog audio
—
XLR 5
front
XLR female
bidirectional
analog audio
—
XLR 6
front
XLR female
bidirectional
analog audio
—
XLR 7
front
XLR female
bidirectional
analog audio
—
XLR 8
front
XLR female
bidirectional
analog audio
—
DB25 (Rear)
rear
db25
bidirectional
analog audio
8
Showing 9 of 9 documented physical ports.
05 · Compare the decision, not just the price.
Alternatives
The rows are organized around fit, power, I/O, and system role so a cheaper unit cannot hide a more expensive workflow.
R196-D25NFThe Redco R196 breakout panel converts a single DB25 connector on the rear into eight individual XLR connections on the front, which is essential when interfacing DB25-equipped gear like the Apollo x16 or RedNet A16R with standard XLR cables. It eliminates the need for bulky DB25 fan-out snakes dangling from the back of your rack. One panel per DB25 port keeps your wiring tidy and professional.View gear →
MMVPThe Switchcraft MMVP is a professional-grade TT (bantam) patch bay offering 48 patch points in a single rack unit. The normalled configuration means signals pass straight through until you patch over them, which is perfect for establishing default signal routing in your rack while maintaining the flexibility to re-route on the fly. A staple in studio and broadcast installations that also works well in complex playback rigs.View gear →
Placement is only the start. Builder checks space · depth · weight, power headroom, dependencies, and compatible signal paths around this exact catalog item.Open in Builder