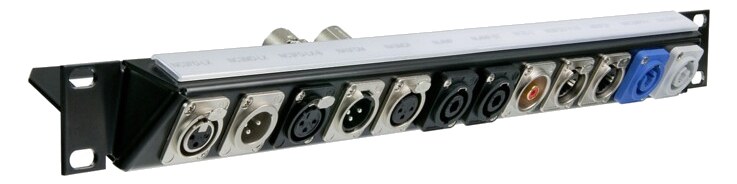
A purely passive 1U rack panel with 16 Neutrik feedthrough XLR connectors — one side on the rack face (labeled stage patch points), the other inside the rack (pre-wired to the stage box). Used to keep stage-box connectors protected inside the rack while giving crew easy, labeled XLR access on the rack face. Colored tape or dust caps on each port identify the role ("M GTR 4", "B VOX", "Song Trax 2") — per-instance port rename on these ports turns the panel into a rig-specific stage map.
~$299Use retailer rows for current price and stock
01 · What it does—and what that changes in your rig.
Product overview
Start with the payoff, then work through how it functions, where it fits, and the details that change a real build.
The payoff
Patch Bay decisions, organized around the whole rig.
The NYS-SPP-16 is a purely passive 1UThe standard slice of rack height: 1U = 1.75″. A 3U box takes three slices; half-rack gear pairs two units side by side in one. panel that does exactly one thing: it gives you 16 labeled XLRThe standard 3-pin locking connector for mics and balanced line signals — pin 1 is the shield, pins 2 and 3 carry the balanced pair. connection points on the rack face, each passing straight through to the back of the rack where your stage-box tails or internal wiring terminate. There is no active circuitry, no power draw, nothing to fail. Its job is to move the chaos of a tangled stage-box multicore off the venue floor and into a structured, protected interface — so every input and output on your rig has a named home that crew can find quickly, patch correctly, and unplug without disturbing anything behind the panel.
Documented outputs
00 destination connections
Documented inputs
0Based on documented inputs
Rack space
1UBuilder checks available rail space
Neutrik product panel1U · 0W
Function
How it works in the path
At 60 mm deep and 1.2 kg, this panel fits in even a shallow tour rack without fighting for space, and the Neutrik feedthrough connectors are the same D-series hardware found throughout professional touring infrastructure — they handle repeated plug cycles without the latch slop you get on cheaper panels. Because everything is passive, there is no distinction between input and output at the connector level; signal direction is determined entirely by how you wire the back. That bidirectional nature means one panel can carry sends, returns, and commsProduction intercom — the wired or wireless party line connecting FOH, monitors, stage managers, and lighting during a show. lines side by side, as long as your labeling makes the routing obvious to the person patching at load-in.
Best fit
Where it earns its place in the rack
This panel earns its place in a dedicated IEMIn-Ear Monitor — earpieces that replace floor wedges, feeding each player their own mix. The reason this whole rack exists. rack, playback rig, or monitor worldThe side-stage domain of the monitor engineer — console, IEM racks, and everything feeding the band’s ears instead of the audience. where you want a clean, repeatable interface between your internal gear and the stage. If your show only needs four or six analog hand-offs, a smaller panel or a few chassis-mount XLRsThe standard 3-pin locking connector for mics and balanced line signals — pin 1 is the shield, pins 2 and 3 carry the balanced pair. will do the job for less money and less rack real estate. And if your primary connections are digital — DanteThe most common audio-over-network standard: dozens of channels of uncompressed digital audio down one ordinary Ethernet cable between Dante boxes., MADIA pro digital format carrying 64 channels on one coax or optical cable. Point-to-point — one sender, one receiver, no network required., AES — this panel does nothing for those; pair it with an appropriate digital breakoutA cable that splits one multichannel connector (like a DB25) into individual plugs — the octopus that turns 8 channels into 8 XLRs. or keep it as a strictly analog complement. Where it truly pays off is in a touring rig that moves every day: one panel means one place to patch, every city, no guesswork.
In the rack
Details worth deciding before load-in.
Label every port before the first show using engraved or printed legend strips in the panel's label windows, then back that up with colored heat-shrink on the internal wiring — color matches port, so a sub or local crew member can re-patch correctly without reading.
Wire the back of the panel with a short, dressed loomSeveral cables bundled and run as one — keeps rack interconnects tidy and makes load-in one grab instead of eight. of pre-made XLRThe standard 3-pin locking connector for mics and balanced line signals — pin 1 is the shield, pins 2 and 3 carry the balanced pair. tails rather than bare wire soldered to the feedthroughs; when a connector eventually needs replacing, you unplug a tail rather than re-solder inside a live rack.
Mount the panel near the top of the rack so it stays accessible when the rack door is open and crew are kneeling at stage level — a panel buried at the bottom invites incorrect patches under show pressure.
Cap any unused ports with Neutrik dust caps at the end of every show; the feedthrough connectors are robust, but debris in a rarely-used port can cause intermittent contact exactly when that line gets called up as a spare during a failure.
02 · Know the whole path before you buy.
Signal path
Learn the route as a block diagram: source, product function, transport, and destination. Select any block to see what enters, what changes, and what leaves.
Interactive block diagramAuto-looping · hover, focus, or tap to hold a stage
Port-type signalProduct functionSystem boundary
Follow one signal from source to destination
Each block answers the same three questions: what arrives, what changes here, and what leaves.
01 · Connection · selected
XLR female
01 · Connection
16 bidirectional connections
XLR female
Connection
16 bidirectional ports
Connector
XLR female
Signal
analog audio
03 · What this product asks of the rest of the system.
Compatibility
Treat connector names as the start of the check—not the answer. These are the boundaries that determine a complete working path.
Best fit · Patch Bay
Use it when 1U and 60 mm of depth fit the case.
Plan the companion path
Complete the path with upstream and downstream gear that matches connector, direction, signal type, protocol, and wiring standard.
Connector boundary
Documented connectors: XLR female. Match connector, direction, and signal type—not shape alone.
04 · Every connector, grouped by job.
I/O ports
Switch the product view and the documented port inventory updates with it—hardware and data stay side by side.
Every connector, grouped by job.
Switch panels to keep the hardware view and the documented port list in sync.
Front panelRear panel
All documented ports for Neutrik 16-Port XLR Pass-Thru Panel
Port
Panel
Connector
Direction
Signal
Channels
Stage Patch 1
rear
XLR female
bidirectional
analog audio
—
Stage Patch 2
rear
XLR female
bidirectional
analog audio
—
Stage Patch 3
rear
XLR female
bidirectional
analog audio
—
Stage Patch 4
rear
XLR female
bidirectional
analog audio
—
Stage Patch 5
rear
XLR female
bidirectional
analog audio
—
Stage Patch 6
rear
XLR female
bidirectional
analog audio
—
Stage Patch 7
rear
XLR female
bidirectional
analog audio
—
Stage Patch 8
rear
XLR female
bidirectional
analog audio
—
Stage Patch 9
rear
XLR female
bidirectional
analog audio
—
Stage Patch 10
rear
XLR female
bidirectional
analog audio
—
Stage Patch 11
rear
XLR female
bidirectional
analog audio
—
Stage Patch 12
rear
XLR female
bidirectional
analog audio
—
Stage Patch 13
rear
XLR female
bidirectional
analog audio
—
Stage Patch 14
rear
XLR female
bidirectional
analog audio
—
Stage Patch 15
rear
XLR female
bidirectional
analog audio
—
Stage Patch 16
rear
XLR female
bidirectional
analog audio
—
Showing 16 of 16 documented physical ports. Scroll to review the remaining rows.
05 · Compare the decision, not just the price.
Alternatives
The rows are organized around fit, power, I/O, and system role so a cheaper unit cannot hide a more expensive workflow.
NYS-SPP-16A purely passive 1U rack panel with 16 Neutrik feedthrough XLR connectors — one side on the rack face (labeled stage patch points), the other inside the rack (pre-wired to the stage box). Used to keep stage-box connectors protected inside the rack while giving crew easy, labeled XLR access on the rack face. Colored tape or dust caps on each port identify the role ("M GTR 4", "B VOX", "Song Trax 2") — per-instance port rename on these ports turns the panel into a rig-specific stage map.View gear →
NZP1RU-12The Neutrik NZP1RU-12 provides a clean row of 12 XLR pass-throughs from front to rear panel, making it easy to present organized connections on the back of your rack while keeping the front accessible for patching. Neutrik connectors ensure reliable, road-worthy connections. This is essential infrastructure for any touring rack where you want quick, repeatable hookups at each venue.View gear →
NYS-SPP-24The 24-port sibling of the 16-port panel. Two rows of twelve Neutrik feedthroughs on a 2U face, giving enough stage patches for a full-band rig with room to spare for playback tracks and comms. Pair with a 32-input stage box (DL32 / S32 / Rio3224) and tape-label each port to make the rig self-documenting at load-in.View gear →
NYS-SPP-32A 32-port 2U feedthrough panel — enough stage patches to 1:1 map every input of a 32-channel stage box (DL32 / S32 / Rio3224). In practice users colour-code and tape-label each port to the instrument / mic it carries ("KICK", "SNARE", "MATT VOX"), turning the front face into a rig-specific stage plot.View gear →
Placement is only the start. Builder checks space · depth · weight, power headroom, dependencies, and compatible signal paths around this exact catalog item.Open in Builder